Showing posts with label Windows 7. Show all posts

Tuesday, July 9, 2013

Stop Highlighting Newly Installed Programs in Start Menu

When you install new windows xp or windows 8 it has already an option selected that it highlight newly installed program and show them highlighted some of them including me don't like this highlighting and they wants to disable highlighting the programs. These are look light yellow background and also showing that 1 new program installed Once application run highlight disappear so let's start it will not show again.

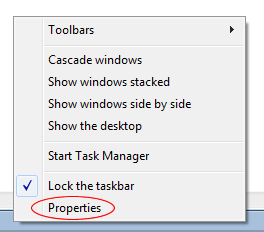
To prevent highlighting, right click on the task bar and select Properties:


Right Click and Click Properties
Then click Start Menu followed by Customize:

Start Menu Customize
 Now scroll down this list and untick "Highlight Newly Installed Programs" and click OK:

Uncheck Highlight Newly Installed Program Click Ok
 You can now close the remaining Window and you will see that applications are now longer highlighted on the start menu.

How to Change Windows 7 Logon Screen

By default, you can't easily change the Windows 7 logon screen background to an image of your choice. But as usual, some clever people have put together some tools to allow this with just a few clicks.

 The following tools are both popular, free ways of doing this:

Julien Manici's Windows 7 Logon Background Changer

Windows 7 Logon Background Changer is a free open source software that let you change the wallpaper of the Windows 7 logon screen (also known as "welcome screen", "login screen" or LogonUI).

It has been tested successfully with the final version of Windows 7 (RTM) and Windows 7 RC 7100. It works with Windows 7 Home Basic, Home Premium, Professional, Ultimate and Enterprise, in x86 or x64 (32 or 64 bits). It does NOT work with Windows 7 Starter (edition sold with most netbooks). It works also on Windows Server 2008 R2 (but you are not supposed to customize a server). 

Tweaks.com Logon Changer for Windows 7

The Tweaks.com Logon Changer for Windows 7 provides an easy way to customize the logon screen background with just a few clicks. Simply download the free application, run it and click Change Logon Screen.

The application will prompt for the location of the new background image and then install the new screen behind the scenes. Tweaks.com Logon Changer will even provide a preview of your new background on a logon screen. 
Manual Method

If you want to manually change the login background, you can do so using these instructions. This requires some understand of registry editing, so should only be performed if you understand the consequences. These instructions are for advanced users only, and the above tools should be used if you are unsure.

First, create a key named OEMBackground in HKLM\Software\Microsoft\Windows\CurrentVersion\Authentication\LogonUI\Background if it doesn't already exist and set it's value to 1.

You can now create/replace images in the following folder with your own choice of logon background:

%windir%\system32\oobe\info\backgrounds

These images need to be under 250k in jpg format with the following filenames (sorted by aspect ratio):

backgroundDefault.jpg
background768x1280.jpg (0.6)
background900x1440.jpg (0.625)
background960x1280.jpg (0.75)
background1024x1280.jpg (0.8)
background1280x1024.jpg (1.25)
background1024x768.jpg (1.33-)
background1280x960.jpg (1.33-)
background1600x1200.jpg (1.33-)
background1440x900.jpg (1.6)
background1920x1200.jpg (1.6)
background1280x768.jpg (1.66-)
background1360x768.jpg (1.770833-)

If your resolution isn't listed in one of the above file formats, the backgroundDefault.jpg will be stretched to fit.
Monday, July 8, 2013

Change Visual Effect Settings and Boost Speed in Windows 7


Today i am going to show you how to adjust the visual effects settings for Windows 7, which changes the appearance and performance of your system. Mostly this is about the performance of your computer which lets you boos the speed by tuning your windows 7. If you want to reduce some of the eye-candy in return for increase performance, that's the right place for you that you land here and gaining some windows 7 boost tips. Let's start messing with this.

To being, type "Adjust the appearance and performance of Windows" in to the start menu search box and press enter. Alternatively, you can go to Control Panel >> System and Security >> System >> Advanced System Settings >> Performance >> Settings.

This will load the visual effects window:


You can now modify the visual options manually, let windows decide, adjust for best appearance or adjust for best performance. Most users will want to leave Windows to decide the appropriate level, but you can select/deselect any of the settings to customize the appearance.

Generally speaking, you will gain a slight performance boost by deselecting more options. Some of the more important settings such as enabling or disabling Aero Peek and Transparent Windows are also found here. Turn off the windows sliding down and other things which loads a little nano seconds to boos the performance.

Sunday, July 7, 2013

Change Location of My Documents Folder in Windows 7


The My Documents folder is a special folder that is attached to each user account as the default save location for many types of file

Let's change the folder to another destination so that you change document to another location and save them.

Normally this is located in "C:\Users\<Username>\Documents", but you may wish to change this path to another directory or drive.


To do so, browse to "C:\Users\<Username>" using Windows Explorer (Press WINDOWS KEY + E to access this). Then, right click on My Documents and select Properties:

Click to Enlarge
Now, click the Location tab at the top:


Then click Move which allows you to select the new location for your My Documents folder. Once you have chosen a new location, click OK to confirm the change:


Your documents are now stored in the new location. Hope you will like this don't forget to share or +1

Tuesday, July 2, 2013

How to Enable Small Memory Dumps in Windows 7

To analyze the cause of system crashes, it's a good idea to have Windows 7 to create small memory dumps which contain further details of the problem.

To enable this functionality, type "view advanced system settings" in to the search menu search box and run the result found under the control panel section. Then, click Settings under the "Startup and Recovery" section of the advanced tab:

Click to Enlarge
Then, make sure you have Small Memory Dump selected from the "write debugging information" section. By default, all minidump files will be saved in %SystemRoot%\Minidump, usually C:\Windows\Minidump:

Click to Enlarge
Click OK when you have changed the settings and then close the remaining window. Small Memory Dumps are now enabled.

How to do Partition Recovery in Windows 7

If you were installing a fresh copy of Windows 7 and by mistake you deleted different partition (D). So you can recover partitions in windows 7 by using different tools available in market. I will share some expert reviews to do that but first read the actual problem done by some one successfully solved.

Problem: I was installing fresh copy of windows 7 and by mistake i deleted the partition. Actually first I deleted and then formatted and then again deleted and finally left it alone. At this moment that partition is unallocated and not visible in Windows 7. I didn't write on it so I want to know is it possible to recover it BUT not by professionals (very, VERY expensive) but by me.

So what is the best way to do that?Bear in mind that I have just basic knowledge.

Answers by Experts:

Solution:
Because you formatted I don't know if you will be able to recover but I suggest you try Steller Phoenix's software. It should be able to tell you IF and what it can recover and then you can decide if the cost is worth it. I haven't used it in many years so I don't know their current rate but they used to be more reasonable than Best Buy's "pay whether we recover or not" fee.

Solution: 
 I think your chances are decent, just don't create a new partition on the allocated space before you run the recovery tools. Also, I have serious doubts about the capabilities of the "free" recovery tools out there. You really don't want to have to try the recovery repeatedly with different tools if you can help it.

Finally the problem solved and partition recovered successfully. May be you feel this is garbage post but people got in new problems and their solutions so one of my this post will help you.