Saturday, April 12, 2014

How to add menu in Wordpress Admin without Plugin

Here we are talking about Adding a menu item in wordpress admin panel to add manual functionality for your themes and plugins etc. Let's do it You need a Wordpress Function called add_action which get 2 parameter. 
add_action Parameters Explanations:
  1.  First parameter is what do you want to add so we write admin menu.
  2. Second parameter is that we will tell wordpress add action that my other explanation will be in signal_adder function
what will be in signal_adder function

We write function signal_adder(){

==>now our add_action will complete after this function  

we are telling wordpress in next line add_posts_page it means our menu item will be in posts section just copy the code and paste in theme functions.php file and you will see there is a menu called Add Signal.

add_posts_page parameter Explanations
  1. First parameter will be the Menu Title 
  2. Second parameter will be the Page Title 
  3. Third parameter will be manage our page options (Fixed just write as it is)
  4. fourth parameter will be your choice because in our admin panel url will be yourhost.com/wp-admin/edit.php?page=signali 
  5. Fifth parameter will be a function in which our other things lie like what will be the page matter or texts etc. 


add_action('admin_menu','signal_adder');

function signal_adder(){
    add_posts_page('Add Signal','Add Signal','manage_options','signali','signal_adder_text');
}
function signal_adder_text(){
    echo "Hurrah i make a custom admin menu";
}

Beginners always feel very ambiguous while making admin menu just write i will comment and solve your problem as already i am beginner not an expert but the problems i tackle i write here. Just follow the path and you will be lead by me. Hope you will like this tutorial then you going to share and comment your review thanks for reading.

How to get Default Timezone in PHP

Here i will talk about timezone which you can't get in PHP there is no built in function to get that.... But here i am with a new technique to get timezone in PHP using Javascript. Let's do it.

First of all Download a small js file from top of this website. Put this file in js folder and replace the name here bold in code


function timeStamp(){
    echo '<script type="text/javascript" src="'js/jstie.min.js" /></script>';
    echo '<script type="text/javascript">';
    echo "var timezone = jstz.determine();";

    $timezoni = "document.write(timezone.name());";
    echo "</script>"; 

    timeStamp();
    date_default_timezone_set($timezoni);

That's all now your timezone will be save in variable $timezoni nothing difficult just call the function timeStamp();  you will get a variable timezoni and put that in date_default_timezone_set() this is the PHP function to set a specific timezone but we do it dynamically.

Hope you will like this tutorial and you going to comment and share this with your friend.

Friday, April 11, 2014

How to Show Timestamp like Seconds and Minutes Ago

Here i am talking about the timestamp which looks like Twitter or Facebook timestamp , 2 Days ago or 4 Days ago or 2 Minutes ago. Same like here is the simple tutorial which will show you how to implement same like this. Once you need to call this function timeAgo($timestamp);and you will just see this stamp one more thing change your timezone according to your taste or server as you wish. Also for the simple way just make your date like "2014-04-11 11:10:20" and take this in $timestamp variable and just call your function you will see these type of timestamp.

function timeAgo($timestamp){
date_default_timezone_set("Asia/Karachi");
    $datetime1=new DateTime("now");
    $datetime2=date_create($timestamp);
    $diff=date_diff($datetime1, $datetime2);
    $timemsg='';
    if($diff->y > 0){
        $timemsg = $diff->y .' year'. ($diff->y > 1?"'s":'');

    }
    else if($diff->m > 0){
     $timemsg = $diff->m . ' month'. ($diff->m > 1?"'s":'');
    }
    else if($diff->d > 0){
     $timemsg = $diff->d .' day'. ($diff->d > 1?"'s":'');
    }
    else if($diff->h > 0){
     $timemsg = $diff->h .' hour'.($diff->h > 1 ? "'s":'');
    }
    else if($diff->i > 0){
     $timemsg = $diff->i .' minute'. ($diff->i > 1?"'s":'');
    }
    else if($diff->s > 0){
     $timemsg = $diff->s .' second'. ($diff->s > 1?"'s":'');
    }

$timemsg = $timemsg.' ago';
echo $timemsg;
}

If you love this tutorials please share it or comment below.

Monday, September 2, 2013

Moving Sideways in Windows 8

Unlike traditional websites or Desktop apps, many Modern UI apps in Windows 8 are designed
for panning or scrolling sideways.

Touch – Simply swipe or slide your finger left or right to pan across the screen.
 
Key/Mouse – Hmmm horizontal scrolling with a traditional mouse, sounds painful right? Don’t
worry, you don’t have to try and use the awkward scroll bar at the bottom of the screen, instead you
can use the mouse wheel to quickly scroll sideways. Scroll down to go to the right and scroll up to go
left.

Closing Down in Windows 8

I don't have close button in windows 8 what should i do people ask and here is the simple solution for this where is the close button situated don't panic just see the tip

Wondering where the “Close” button is for your Modern UI apps? Well, it simply doesn’t exist
anymore! Instead to close an app just:

Touch – Swipe your finger down from the top of the screen to the bottom of the screen.
Key/Mouse – Click and drag downwards on the app from the top of the screen to the bottom of
the screen. Or use the keyboard shortcut: Alt + F4 (or Alt + Fn + F4)

Closing Down in Windows 8


Monday, July 15, 2013

Pin Ups in Windows 8

In addition to using the Search charm to launch apps, you can “Pin” your favorite apps and file locations to the Start Screen for easy access.

Touch – To “Pin” an app to the Start Screen, locate the app with the Search charm and swipe-select
on the search result to bring up the App command bar, then select Pin to Start.

To “Pin” a File Location to the Start Screen, locate a file with the Search charm and swipe select on the search result to bring up the App command bar, then select Open file location. Long press on the File Location to bring up the context menu, then select Pin to Start.

Pin Ups in Windows 8
Key/Mouse – To “Pin” an app to the Start Screen, locate the app with the Search charm and right-click on the search result to bring up the App command bar, then select Pin to Start.

To “Pin” a File Location to the Start Screen, locate a file with the Search charm and right-click on the search result to bring up the App command bar, then select Open file location. Right-click on the File Location to bring up the context menu, then select Pin to Start.

Saturday, July 13, 2013

Selecting an Item and Finding Greater Context in Windows 8

In Windows 8, you can select individual items on the screen to show more details and in many
cases, reveal additional commands via App bars and Context Menus.

Touch – You can select an item to see more details by either performing a “Swipe-Select” in the
Modern UI or a “Long-Press” in the Desktop.

To perform a Swipe-Select, quickly swipe up or down on the item and a tick will appear on the
top right corner of the item.


To perform a Long-Press, tap & hold your finger on the screen until a square appears underneath it, then release your finger from the screen.


Key/Mouse – Right-click on an item to select it and see more details.

Apps Bar in Windows 8


To keep the look of the Modern UI in Windows 8 crisp & clean, many app commands have been hidden from view in menu bars that, depending on the app you’re using, can be called into view from the top and/or bottom of the screen. To show these app command bars:


Touch – Perform a small swipe inwards from the bottom or top edge of the screen.

Key/Mouse – Right-click in open space to see the app command bars. Or use the

Shortcut: + Z

Friday, July 12, 2013

PHP Reference Sheet - Quick Reference

Data Types
integer, float, boolean, string, array, object, resource, NULL
Variable Declarations
$variablename = <value>;
$anothervariable =& $variablename; (Assign by Reference)
Declare Array
$arrayname = array();
Initialize Array
$arrayname = array(<value1>, <value2>, <value3>);
$arrayname = array(<key> => <value>, <key> => <value>); (Define Keys)
$multiarray = array(<key> => array(<value1>,<value2>)); (Multi-dimensional)
Common Array Functions
sort(<array>); (Sort array assigns new keys)
asort(<array>); (Sort array maintain keys)
rsort(<array>); (Sort array in reverse, new keys)
arsort(<array>); (Sort array in reverse, maintain keys)
count(<array>); (Count elements)
count(<array>,COUNT_RECURSIVE); (Count multidimensional array)
array_push(<array>,<value>); (Push item onto end of array)
array_pop(<array>); (Pop item off end of array)
Comments
// Comment text
/* Multi-line comment text */
# Comment text
Arithmetic Operators
+ (Addition), - (Subtraction), * (Multiplication), / (Division), % (Modulus)
Relational Operators
== (Equal), === (Equal with type comparison), != (Not equal), <> (Not equal), !== (Not Equal
with type comparison), < (Less than), > (Greater than), <= (Less than or equal to), >=
(Greater than or equal to)
Logical Operators
! (logical NOT), && (logical AND), || (logical OR), xor (logical XOR)
Assignment Operators
= (Assign), += (Addition), -= (Subtraction), *= (Multiplication), /= (Division), .=
(Concatenation), %= (Modulus), &= (And), |= (Or), ^= (Exclusive Or), <<= (Left Shift), >>=
(Right Shift)
String Concatenation
. (Period)
String Manipulation
substr(<string>,<start>,[<length>]);
strlen(<string>);
trim(<string>);
ltrim(<string>); // Trim left
rtrim(<string>); // Trim right
strtolower(<string>);
strtoupper(<string>);
str_replace(<search>,<replace>,<string>,[<count>]);
strpos(<string>, <search>);
strcmp(<string1>,<string2>); (Binary safe string comparison)
strcasecmp(<string1>,<string2>); (Binary safe case-insensitive comparison)
explode(<delim>,<string>,[<limit>]); (Break string into array)
implode(<delim>,<array>); (Join array into string separated by delim)
Cookies
setcookie (<cookiename>, [<value>],[<expire_time_in_secs_since_epoch>]);
$_COOKIE['cookiename']; (Returns value of cookie)
Sessions
session_start(); (Create session)
$_SESSION['key_name'] = value; (Set session variable)
$variablename = $_SESSION['key_name']; (Retrieve value from session variable)
session_destroy(); (Destroy session)
Error Handling
try {
<statements that may cause error>;
}
catch (<Exception Class> $exception_name)
{
<statements to execute when error is caught>;
}
Super Globals
$GLOBALS (Access all global variables in script)
$_SERVER (Access web server variables)
$_GET (Values passed to script through URL)
$_POST (Values passed to script through HTTP Post)
$_COOKIE (Values passed by user cookie)
$_FILES (Values passed by HTTP Post File Uploads)
$_ENV (Values passed to script via the environment)
$_REQUEST (Values passed by URL, HTTP Post, or user Cookies)
$_SESSION (Values passed through user's session)
If Else
if (<condition 1>)
{ <statement 1>; }
elseif (<condition 2>)
{ <statement 2>; }
else
{ <statement 3>; }
Inline If (Ternary)
<condition> ? true : false;
For Loop
for (<initialize>;<condition>;<update>)
{
<statements>;
}
For Each Loop
foreach (<array> as [<value> |<key> => <value>])
{
<statements>;
[break];
[continue];
}
While Loop
while (<condition>)
{
<statements>;
}
Do-While Loop
do
{
<statements>;
} while (<condition>);
Switch
switch (<expression>)
{
case <literal or type>:
<statements>;
[break;]
case <literal or type>:
<statements>;
[break;]
default:
<statements>;
}
Function Structure
function <function_name>([<parameters>])
{
<statements>;
[return <value>;]
}
Class Structure
class <class_name> [<extends base_class>]
{
[var | <modifiers*>] [<class member variables>];
[<modifiers*>] function <function_name>([<parameters>])
{
<statements>;
}
}
* Modifiers <public | pr ivate | static> are implemented in PHP5
Declare and Use Class
$variable = new class_name();
$variable->function_name();
class_name::function_name(); (Static call)

Quick Cycle and Recent Apps in Windows 8

Quick Cycle:

To quickly cycle between open apps:

Touch – Swipe inwards from the left edge of the screen.

Key/Mouse – Move the mouse pointer into the upper left-hand corner and click to cycle through each app.

You can also cycle through open apps with the keyboard shortcut: Alt + Tab

Quick Cycle in Windows 8
Show Recent Apps:

Recent apps helps every time and get you to the higher usability because you recently go to apps again and again by just tapping recent apps in windows 8 look at how to show a list of your recently used apps:
 

Touch – Swipe in and back out from the left edge of the screen.
 

Key/Mouse – Move the mouse pointer to the upper or lower left corners of the screen, then move the mouse along the left-hand edge of the screen towards the center. You can also use the 

keyboard shortcut: + Tab , Hold down the key and keep tapping the Tab key to cycle through
the list.


Install C Plus Plus in Urdu Video Class 2

Class 2 of C Plus Plus:
Installation of C Plus Plus is very easy you just need to download a C Plus Plus Setup and then next you can watch the video in Urdu.

What will you Learn ?
  • How to Install C++.
  • Video Include how to Install C++.
  • How to download C++.
  • How to Create a C++ Interface.
This class will guide you through the above content Installing, Downloading.

Video:

Tuesday, July 9, 2013

Stop Highlighting Newly Installed Programs in Start Menu

When you install new windows xp or windows 8 it has already an option selected that it highlight newly installed program and show them highlighted some of them including me don't like this highlighting and they wants to disable highlighting the programs. These are look light yellow background and also showing that 1 new program installed Once application run highlight disappear so let's start it will not show again.

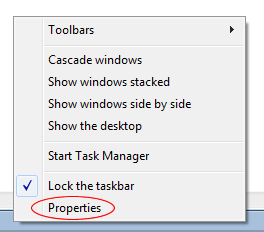
To prevent highlighting, right click on the task bar and select Properties:


Right Click and Click Properties
Then click Start Menu followed by Customize:

Start Menu Customize
 Now scroll down this list and untick "Highlight Newly Installed Programs" and click OK:

Uncheck Highlight Newly Installed Program Click Ok
 You can now close the remaining Window and you will see that applications are now longer highlighted on the start menu.

How to Change Windows 7 Logon Screen

By default, you can't easily change the Windows 7 logon screen background to an image of your choice. But as usual, some clever people have put together some tools to allow this with just a few clicks.

 The following tools are both popular, free ways of doing this:

Julien Manici's Windows 7 Logon Background Changer

Windows 7 Logon Background Changer is a free open source software that let you change the wallpaper of the Windows 7 logon screen (also known as "welcome screen", "login screen" or LogonUI).

It has been tested successfully with the final version of Windows 7 (RTM) and Windows 7 RC 7100. It works with Windows 7 Home Basic, Home Premium, Professional, Ultimate and Enterprise, in x86 or x64 (32 or 64 bits). It does NOT work with Windows 7 Starter (edition sold with most netbooks). It works also on Windows Server 2008 R2 (but you are not supposed to customize a server). 

Tweaks.com Logon Changer for Windows 7

The Tweaks.com Logon Changer for Windows 7 provides an easy way to customize the logon screen background with just a few clicks. Simply download the free application, run it and click Change Logon Screen.

The application will prompt for the location of the new background image and then install the new screen behind the scenes. Tweaks.com Logon Changer will even provide a preview of your new background on a logon screen. 
Manual Method

If you want to manually change the login background, you can do so using these instructions. This requires some understand of registry editing, so should only be performed if you understand the consequences. These instructions are for advanced users only, and the above tools should be used if you are unsure.

First, create a key named OEMBackground in HKLM\Software\Microsoft\Windows\CurrentVersion\Authentication\LogonUI\Background if it doesn't already exist and set it's value to 1.

You can now create/replace images in the following folder with your own choice of logon background:

%windir%\system32\oobe\info\backgrounds

These images need to be under 250k in jpg format with the following filenames (sorted by aspect ratio):

backgroundDefault.jpg
background768x1280.jpg (0.6)
background900x1440.jpg (0.625)
background960x1280.jpg (0.75)
background1024x1280.jpg (0.8)
background1280x1024.jpg (1.25)
background1024x768.jpg (1.33-)
background1280x960.jpg (1.33-)
background1600x1200.jpg (1.33-)
background1440x900.jpg (1.6)
background1920x1200.jpg (1.6)
background1280x768.jpg (1.66-)
background1360x768.jpg (1.770833-)

If your resolution isn't listed in one of the above file formats, the backgroundDefault.jpg will be stretched to fit.

Quick Launch in Windows 8

Why Microsoft removed the traditional Start button or how to find your apps, settings and files in Windows 8? The answers can be found in the evolution of desktop searching. The speed and functionality of Search Tools have improved so much in recent years that one of the quickest ways to find and launch a file or app, is to search for it. So instead of searching for the Start button, you should start with the Search charm.

Touch – Swipe inwards from the right edge of the screen to bring up the Charms menu. Then tap on the Search charm. You can filter your results by tapping Apps, Settings or Files and even choose to search for items within certain Windows 8 apps, like an email message in the Mail app.

Quick Launch in Windows 8
Key/Mouse – Go to the Start Screen and just start typing to bring up the Search charm. You can filter your results by clicking Apps, Settings or Files and even choose to search for items within certain Windows 8 apps, like an email message in the Mail app.

Note: You can also use the following keyboard shortcuts to jump directly to your desired search
filter. To search for Apps use:+. + Q. To search for Settings use: + W. To search for Files use: +F

Monday, July 8, 2013

Change Visual Effect Settings and Boost Speed in Windows 7


Today i am going to show you how to adjust the visual effects settings for Windows 7, which changes the appearance and performance of your system. Mostly this is about the performance of your computer which lets you boos the speed by tuning your windows 7. If you want to reduce some of the eye-candy in return for increase performance, that's the right place for you that you land here and gaining some windows 7 boost tips. Let's start messing with this.

To being, type "Adjust the appearance and performance of Windows" in to the start menu search box and press enter. Alternatively, you can go to Control Panel >> System and Security >> System >> Advanced System Settings >> Performance >> Settings.

This will load the visual effects window:


You can now modify the visual options manually, let windows decide, adjust for best appearance or adjust for best performance. Most users will want to leave Windows to decide the appropriate level, but you can select/deselect any of the settings to customize the appearance.

Generally speaking, you will gain a slight performance boost by deselecting more options. Some of the more important settings such as enabling or disabling Aero Peek and Transparent Windows are also found here. Turn off the windows sliding down and other things which loads a little nano seconds to boos the performance.

Sunday, July 7, 2013

Change Location of My Documents Folder in Windows 7


The My Documents folder is a special folder that is attached to each user account as the default save location for many types of file

Let's change the folder to another destination so that you change document to another location and save them.

Normally this is located in "C:\Users\<Username>\Documents", but you may wish to change this path to another directory or drive.


To do so, browse to "C:\Users\<Username>" using Windows Explorer (Press WINDOWS KEY + E to access this). Then, right click on My Documents and select Properties:

Click to Enlarge
Now, click the Location tab at the top:


Then click Move which allows you to select the new location for your My Documents folder. Once you have chosen a new location, click OK to confirm the change:


Your documents are now stored in the new location. Hope you will like this don't forget to share or +1

Hundred 100 Tutorials for Windows 8

When you first use Windows 8 the most obvious change you will notice is the new Start Menu (now called the Start Screen), which automatically appears as you start Windows, and takes up the whole display. At first this sweeping change of design, called the Modern UI, can be a bit of a shock for even the most experienced Windows user. Some common responses upon first seeing Windows 8 are “Oh My God! Where’s the Desktop?” “What happen to the Start button?” or “How do I find my way around this thing?”

If you’re feeling a bit lost too, don’t worry, in this post you’ll learn how to navigate the new Windows 8 environment using either touch gestures or keyboard and mouse shortcuts.

Table of Contents
1. Windows Charms in Windows 8
2. Quick Launch in Windows 8
3. Quick Cycle and Recent Apps in Windows 8
4.Apps Bar in Windows 8
5.Selecting an Item and Finding Greater Context in Windows 8
6.Pin Ups in Windows 8

Window Charms in Windows 8

Window Charms:
Whenever you think about start menu you just think of windows xp where a menu bar is there and you quick access it but  in windows 8 , A menu bar of commonly used system commands, called "charms", can be accessed from the right side of your screen. These charms include a handy shortcut back to the Start Screen as well as Search, Share, Devices and Settings. You can access the Charms menu in the following ways:

Touch – Swipe inwards from the right edge of the screen.

Key/Mouse – Move the mouse pointer to the upper or lower right corners of the screen, then move the mouse along the right-hand edge of the screen towards the charms as they appear.

Note: Many of the keyboard shortcuts used in Windows 8 involve a special key on your keyboard called the Windows Logo Key. On an existing keyboard it should look like this or on a new keyboard like this and is located in the bottom left-hand corner between the Ctrl and Alt keys. Throughout this guide I will use the new Windows 8 logo to refer to this key. For example, the Charms menu can also be accessed via a keyboard shortcut, by pressing the Windows Logo Key and the letter “C” key at the same time. This shortcut can be showed as: + C

Saturday, July 6, 2013

Samsung Galaxy Phone Memory Full Problem


I was checking the Samsung Galaxy Discussion point and find this problem unsolved in which people saying that we don't have much memory in phone whenever i installed and application in my samsung galaxy it says phone memory full so i decide to share some specific solution for this to overcome this problem. Hope so you have memory card in your phone so we can take care of the rest of the problem.


Let's Download this Application

To install this please uninstall an application so you can install this application because there is no space to install also this. and This will totally solved your problem in minutes it will move your whole games and apps from phone to the memory card and you will surely able to installed new applications and new data and games in your samsung galaxy phone.

Also we have another application which will
I Hope you will find this small post very handy and problem solving post. I will wait for your thanks in bottom of the post in my comment box.

Sql Server Problem Windows Installer Needed

Today i was facing a problem while installing Sql Server in my Computer .

 It says " Windows Installer Needed "

So i figure out and find some downloads from Microsoft website that is windows installer for the windows xp to overcome some problem causing installation and interrupt me to install Sql Server.

 Note: If anything says windows installer needed then you can download this installer and all problem will solve.

Click Download this Installer to install SQL server 
which need Windows Installer.

More Over Extra Error:

This will solve your problem but if the problem persist may be you don't have .net framework then

Download .net Framework Here for Windows XP

If you have Windows 7 then Download this.

Download .net Framework Here for Windows 7 (x64)